Svelte

Svelte is a popular JavaScript UI framework that uses a compiler to write reactive components. Learn how to build a Cloud Phone widget using Svelte, or skip ahead to the finished sample code and live demo hosted on GitHub Pages.
Need a primer on Cloud Phone?
Getting started with Cloud Phone
Learn how Cloud Phone brings compelling web apps to the next billion users
Setup
Prerequisites
- Node & npm
- Git
- A GitHub account
Dependency Versions
This sample was developed using the following libraries and frameworks.
| Dependency | Version |
|---|---|
| Node | v20.11.0 (LTS) |
| npm | 10.9.0 |
| Svelte | v5 |
| Svelte CLI | 0.6.10 |
| SvelteKit | 2.15.1 |
| adapter-static | 3 |
| sveltekit-i18n | 24 |
| Vite | 6 |
Svelte CLI Setup
Use sv, SvelteKit’s command line interface (CLI) to scaffold a new SvelteKit project.
npx sv create cloudphone-svelte-sampleYou can also use . for the project name to scaffold in the current directory.
Then follow the prompts to create a new SvelteKit project using npm (or your preferred package manager) to install dependencies into the node_modules/ directory.
┌  Welcome to the Svelte CLI! (v0.6.10)
│
◇  Which template would you like?
│  SvelteKit minimal
│
◇  Add type checking with Typescript?
│  No
│
◆  Project created
│
◇  What would you like to add to your project? (use arrow keys / space bar)
│  none
│
◇  Which package manager do you want to install dependencies with?
│  npm
│
◆  Successfully installed dependencies
│
◇  Project next steps ─────────────────────────────────────────────────────╮
│                                                                          │
│  1: cd cloudphone-svelte-sample                                          │
│  2: git init && git add -A && git commit -m "Initial commit" (optional)  │
│  3: npm run dev -- --open                                                │
│                                                                          │
├──────────────────────────────────────────────────────────────────────────╯
│
└  You're all set!
The command npm run dev is aliased in the scripts section of the package.json file to run vite dev. This command starts a local HTTP server on port 5173 (by default), available at http://localhost:5173/
  "scripts": {
    "dev": "vite dev",
    "build": "vite build",
    "preview": "vite preview"
  }
Development
Routing
SvelteKit provides routing with both server side rendering (SSR) and client side rendering (CSR).
Install adapter-static using NPM for single-page application (SPA) routing:
npm i -D @sveltejs/adapter-staticThen in svelte.config.js, replace the @sveltejs/adapter-auto import with @sveltejs/adapter-static:
import adapter from "@sveltejs/adapter-static";

/** @type {import('@sveltejs/kit').Config} */
const config = {
  kit: {
    adapter: adapter()
  }
};

export default config;
Internationalization
sveltekit-i18n is a popular package for handling internationalization (abbreviated i18n) in Svelte apps.
npm install sveltekit-i18nFor this demo, store translations as JSON files located at src/lib/translations/<language_code>/*.json. Define a configuration like the one below.
import i18n from "sveltekit-i18n";

export const getLanguageName = (contextLanguage, languageCode) => {
  // https://developer.mozilla.org/en-US/docs/Web/JavaScript/Reference/Global_Objects/Intl/DisplayNames
  return new Intl.DisplayNames([contextLanguage], {
    type: "language"
  }).of(languageCode);
};

/** @type {import('sveltekit-i18n').Config} */
const config = {
  translations: {
    en: {
      en: getLanguageName("en-US", "en"),
      es: getLanguageName("en-US", "es-MX")
    },
    es: {
      en: getLanguageName("es-MX", "en-US"),
      es: getLanguageName("es-MX", "es-MX")
    }
  },
  loaders: [
    {
      locale: "en",
      key: "common",
      loader: async () => (await import("./en/common.json")).default
    },
    {
      locale: "es",
      key: "common",
      loader: async () => (await import("./es/common.json")).default
    },
    {
      locale: "en",
      key: "about",
      loader: async () => (await import("./en/about.json")).default
    },
    {
      locale: "es",
      key: "about",
      loader: async () => (await import("./es/about.json")).default
    }
  ]
};

export const { t, locale, locales, loading, loadTranslations } = new i18n(config);
The demo includes two lasy-loaded translations–English and Spanish–and uses the Intl API to get the display name of each supported language. Translations are namespaced using the key property, prefixed during lookups.
<script>
  import { t } from '$lib/translations';
</script>

<h2>{$t('common.about')}</h2>
Automatically set the default language based on the navigator.language.
import { locale, locales, loadTranslations } from "$lib/translations/index";

const defaultLocale = "en";

// This is a very naive approach. Consider using a library
// that doesn't drop country codes
function getDefaultLanguage(languageSet) {
  const preferredLanguage = (navigator.language || "").split("-")[0].toLowerCase();
  if (languageSet.has(preferredLanguage)) return preferredLanguage;
  return defaultLocale;
}

// Disable server side rendering (SSR)
export const ssr = false;

/** @type {import('@sveltejs/kit').Load} */
export const load = async () => {
  // Default to the user-selected locale, if set
  // Otherwise try to match the browser language, if available
  const userLanguage = locale.get();
  const initialLocale = userLanguage ? userLanguage : getDefaultLanguage(new Set(locales.get()));

  await loadTranslations(initialLocale);

  return {};
};
This sample ignores the country code when determining the default language. See next-language-detector for a better matching example.
Keyboard Navigation
Cloud Phones have directional pads (D-pads) to support keyboard navigation. Unlike desktop that uses the tabindex property and Tab (⇥) key to the next focusable element, Cloud Phone uses Arrow keys (↑↓←→).
 |  |
|---|
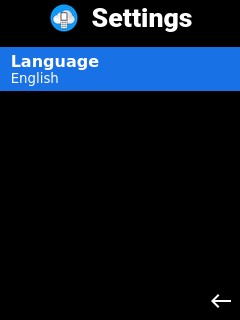
Autofocus on the first element in a page, list, or grid to set the user’s bearings. Use the autofocus attribute to take advantage of the browser’s native autofocus capabilities.
<script>
  const autofocus = (element) => element?.focus();
</script>

<section id="app">
  <h1>Settings</h1>
  <button autofocus>Language</button>
</section>
However, the autofocus attribute will trigger a a11y_autofocus compiler warning that can be suppressed with the <!-- svelte-ignore a11y_autofocus --> comment. Alternatively, Svelte Actions are element-lifecycle functions declared by the use directive.
<script>
	const autofocus = (element) => element?.focus();
</script>

<section id="app">
  <h1>Settings</h1>
  <button use:autofocus>Language</button>
</section>
Extend the use directive approach to autofocus on the first item in a list.
// CSS selector to find focusable elements
const FOCUSABLE_CSS_SELECTOR = `a[href], button:not([disabled]), input:not([disabled]), select:not([disabled]), textarea:not([disabled]), *[tabindex], *[contenteditable]`;

// Find the first focusable element in a container (i.e. list)
function findFirstFocusable(container) {
  return container.querySelector(FOCUSABLE_CSS_SELECTOR);
}

// Auto-focus the first focusable item in element when its mounted
function autoFocusFirstFocusable(element) {
  if (element) {
    findFirstFocusable(element)?.focus();
  }
}
This technique is used in the OptionsMenu component. Here is a simplified example:
<script>
import { autoFocusFirstFocusable } from "$lib/utils";
const { items = [] } = $props();
</script>
<menu use:autoFocusFirstFocusable>
{#each items as item, index}
<a {...item}>{item.text}</a>
{/each}
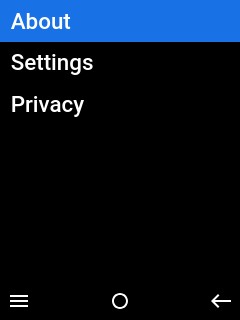
</menu>The OptionsMenu component can have links as children, to create a navigation menu triggered by the Left Soft Key (LSK)
<OptionsMenu
  items={[{
    href: '/about',
    text: $t('common.about'),
  }, {
    href: '/settings',
    text: $t('common.settings'),
  }, {
    href: 'ttps://www.cloudphone.tech/dev-privacy',
    target: '_self',
    text: $t('common.privacy')
  }]} />
Hosting on GitHub Pages
GitHub Pages provides free hosting for public, open-source repositories. This demo uses the github-pages-deploy-action GitHub Action to build and deploy HTML, CSS, and JS. The action is defined in pages.yml.
Update SvelteKit Config to use adapter-static to create a single page application (SPA) that’s compatible with GitHub Pages. Replace config.kit.paths.base with your GitHub repository name.
import adapter from "@sveltejs/adapter-static";

/** @type {import('@sveltejs/kit').Config} */
const config = {
  kit: {
    adapter: adapter({
      fallback: "index.html"
    }),
    paths: {
      base: process.env.NODE_ENV === "production" ? "/cloudphone-svelte-sample" : ""
    }
  }
};

export default config;
Use a two-step GitHub Action to build and deploy the SPA on pushes to the main branch. By default, adapter-static builds in the /build directory determined by the pages and assets configurations.
name: Deploy Pages
on:
  push:
    branches:
      - main

jobs:
  build:
    runs-on: ubuntu-latest
    steps:
      - name: "Checkout 🛎️"
        uses: actions/checkout@v2
      - name: "Setup Node 🚧"
        uses: actions/setup-node@v4
        with:
          node-version: ">=20.11.0"
          cache: npm
      - name: "Dependencies 🏗️"
        run: |
          npm ci
      - name: "Build 🔧"
        run: |
          npm run build
        env:
          BASE_PATH: "/${{ github.event.repository.name }}"
      - name: Upload Artifacts
        uses: actions/upload-pages-artifact@v3
        with:
          path: "build/"

  deploy:
    needs: build
    runs-on: ubuntu-latest
    permissions:
      pages: write
      id-token: write
    environment:
      name: github-pages
      url: ${{ steps.deployment.outputs.page_url }}
    steps:
      - name: "Deploy 🚀"
        id: deployment
        uses: actions/deploy-pages@v4
Wrap Up
Tips
Take full advantage of the Svelte compiler optimizations and growing ecosystem with the following tips.
Static Site Generator
Use SvelteKit’s adapter-static to generate a static website, if your app is simple enough. Use the Accept-Language header to default users to their preferred language.
Component Library
Build faster with robust component libraries like Material UI, Skeleton, or Flowbite. Many libraries like Svelte Material UI (SMUI) are keyboard-accessible by default.
Testing
Develop reliably with testing utilities like Vitest and Playwright. Target Chromium in Playwright to most closely match Cloud Phone.
Svelte Tips
- Use the Svelte VS Code integrated development environment (IDE) plugin
- Segment your application into reusable components
- Maintain an organized file structure
- Use descriptive variable and function names
- Move complex logic outside of components
Next Steps
Register for the Cloud Phone Developer Program to try the live demo on the Cloud Phone Simulator or a physical device. Fork us on GitHub to start coding your first Cloud Phone widget using Svelte and set up a custom domain name to point to GitHub Pages.