Vue

Vue.js is a progressive JavaScript framework for building web user interfaces. It is reactive, compiler-optimized, and originally developed by Evan You in 2014. Learn how to build a Cloud Phone widget using Vue, or skip ahead to the finished sample code and live demo hosted on GitHub Pages.
Need a primer on Cloud Phone?
Getting started with Cloud Phone
Learn how Cloud Phone brings compelling web apps to the next billion users
Setup
Prerequisites
- Node & npm
- Git
- A GitHub account
Dependency Versions
This sample was developed using the following libraries and frameworks.
| Dependency | Version |
|---|---|
| Node | v20.11.0 (LTS) |
| npm | 10.9.0 |
| Vue | 3.5.13 |
| Vue Router | 4.5.0 |
vue-i18n | 11.0.1 |
| Vite | 6 |
Vue CLI Setup
create-vue is the official project scaffolding tool for Vue.js. Run the command below to get started.
npm create vue@latestFollow the prompts to create a new Vue project then use npm (or your preferred package manager) to install dependencies into the node_modules/ directory.
Vue.js - The Progressive JavaScript Framework

✔ Package name: … cloudphone-vue-sample
✔ Add TypeScript? … No / Yes
✔ Add JSX Support? … No / Yes
✔ Add Vue Router for Single Page Application development? … No / Yes
✔ Add Pinia for state management? … No / Yes
✔ Add Vitest for Unit Testing? … No / Yes
✔ Add an End-to-End Testing Solution? › No
✔ Add ESLint for code quality? › Yes
✔ Add Prettier for code formatting? … No / Yes

Scaffolding project in ~/cloudphone-vue-sample...

Done. Now run:

  npm install
  npm run format
  npm run dev
Once complete, your project setup will look something like this. It includes helpful links as well as toggles for Vue.js Developer Tools and the Component Inspector.

The command npm run dev is aliased in the scripts section of the package.json file to run vite. This command starts a local HTTP server on port 5173 (by default), available at http://localhost:5173/
  "scripts": {
    "dev": "vite",
    "build": "vite build",
    "preview": "vite preview",
    "lint": "eslint . --fix",
    "format": "prettier --write src/"
  }
Development
Routing
Vue Router is the official router for Vue.js. Install it using npm if you didn’t already during project scaffolding.
npm install vue-router@4To prepare for GitHub Pages deployment, update the base path configuration in vite.config.js. GitHub Pages URLs take the following format: https://<USERNAME>.github.io/<REPO-NAME>/. Here <REPO-NAME> is cloudphone-vue-sample, the root directory for this project.
import process from "node:process";
import { defineConfig } from "vite";

// https://vite.dev/config/
export default defineConfig({
  base: process.env.NODE_ENV === "production" ? "/cloudphone-vue-sample" : "/"
});
Internationalization
vue-i18n is a component-oriented package for handling internationalization (abbreviated i18n) in Vue.js apps. vue-i18n supports Vue 3 and single file components. Install vue-i18n with npm:
npm install vue-i18n@11For this demo, store translations as JSON files located at src/locales/<language_code>.json. Define a configuration like the one below and register the i18n plugin.
import { createApp } from "vue";
import { createI18n } from "vue-i18n";
import en from "./locales/en.json";
import es from "./locales/es.json";

const i18n = createI18n({
  legacy: false,
  locale: "en",
  fallbackLocale: "en",
  messages: {
    en: en,
    es: es
  }
});

const app = createApp(App);
app.use(i18n);
app.mount("#app");
As an alternative, use unplugin-vue-i18n available for Vite and Webpack.
The demo includes two globally-scoped translations–English and Spanish–statically bundled with the application. It uses Composition Mode to take advantage of Vue 3’s Composition API, instead of the deprecated Legacy API.
Import useI18n in setup to return a Composer instance that provides access to translations via the function t.
<script setup>
import { useI18n } from "vue-i18n";
const { t } = useI18n();
</script>

<template>
  <section id="app">
    <h2>{{ t("about") }}</h2>
    <p>{{ t("about.description") }}</p>
  </section>
</template>
For larger applications or those with frequently-changing copy, consider lazy-loading locales to dynamically fetch only the translations needed, instead of bundling all translations into your app.
Automatically set the default language based on the navigator.language.
<script setup>
import { useI18n } from "vue-i18n";
const { t, locale, availableLocales } = useI18n();

const defaultLocale = "en";
const savedLanguage = localStorage.getItem("lang");

// This is a very naive approach. Consider using a library
// that doesn't drop country codes
function getDefaultLanguage(languageSet) {
  const preferredLanguage = (navigator.language || "").split("-")[0].toLowerCase();
  if (languageSet.has(preferredLanguage)) return preferredLanguage;
  return defaultLocale;
}

// Restore saved locale, or set a reasonable default
if (!locale.value || savedLanguage) {
  locale.value = savedLanguage || getDefaultLanguage(new Set(availableLocales));
}
</script>
Keyboard Navigation
Cloud Phones have directional pads (D-pads) to support keyboard navigation. Unlike desktop that uses the tabindex property and Tab (⇥) key to the next focusable element, Cloud Phone uses Arrow keys (↑↓←→).
 |  |
|---|
Autofocus on the first element in a page, list, or grid to set the user’s bearings. Use the autofocus attribute to take advantage of the browser’s native autofocus capabilities.
<template>
<button :autofocus="true">
{{ t("clickme") }}
</button>
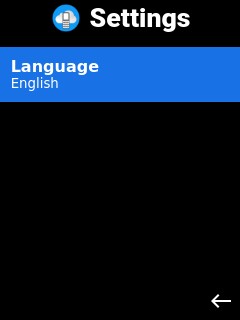
</template>Alternatively, set up a Watcher to autofocus as a “side effect” of DOM element creation.
<script>
import { ref, watch } from "vue";
const autofocus = (element) => element?.focus();

const langButton = ref(null);

// Auto-focus the language button
watch(langButton, (buttonRef) => autoFocus(buttonRef?.value));
</script>

<template>
  <button ref="langButton">
    {{ t("language") }}
  </button>
</template>
Extend the Watcher approach to autofocus on the first item in a list.
<script setup>
import { ref, watch } from "vue";
// i.e. https://github.com/KittyGiraudel/focusable-selectors/blob/main/index.js
const FOCUSABLE_CSS_SELECTOR = `a[href], button:not([disabled]), input:not([disabled]), select:not([disabled]), textarea:not([disabled]), *[tabindex], *[contenteditable]`;
function findFirstFocusable(container) {
return container.querySelector(FOCUSABLE_CSS_SELECTOR);
}
const autoFocusFirstFocusable = (element) => {
if (element) {
findFirstFocusable(element)?.focus();
}
};
const menuRef = ref(null);
const focusedIndex = ref(0);
// Autofocus first element in list
watch(menuRef, (newRef) => autoFocusFirstFocusable(newRef?.value));
</script>
<template>
<menu ref="menuRef">
<component v-for="(child, index) in slots.default?.() || []" :key="index" :is="child" :class="{ focused: index === focusedIndex }" />
</menu>
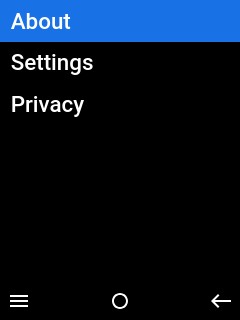
</template>The OptionsMenu component can have links as children, to create a navigation menu triggered by the Left Soft Key (LSK)
<template>
  <OptionsMenu>
    <RouterLink to="/about">{{ t("about") }}</RouterLink>
    <RouterLink to="/settings">{{ t("settings") }}</RouterLink>
    <a href="https://www.cloudphone.tech/dev-privacy">
      {{ t("privacy") }}
    </a>
  </OptionsMenu>
</template>
The snippet above creates an options menu with three links. The first two are local routes to the About and Settings page, while the third is an external link to another website.
Hosting on GitHub Pages
GitHub Pages provides free hosting for public, open-source repositories. This demo uses the github-pages-deploy-action GitHub Action to build and deploy HTML, CSS, and JS. The action is defined in pages.yml.
Set the base path configuration in vite.config.js to match your repository name. Use a two-step GitHub Action to build and deploy the SPA on pushes to the main branch.
name: Deploy Pages
on:
  push:
    branches:
      - main

jobs:
  build:
    runs-on: ubuntu-latest
    steps:
      - name: "Checkout 🛎️"
        uses: actions/checkout@v2
      - name: "Setup Node 🚧"
        uses: actions/setup-node@v4
        with:
          node-version: ">=20.11.0"
          cache: npm
      - name: "Dependencies 🏗️"
        run: |
          npm ci
      - name: "Build 🔧"
        run: |
          npm run build
        env:
          BASE_PATH: "/${{ github.event.repository.name }}"
      - name: Upload Artifacts
        uses: actions/upload-pages-artifact@v3
        with:
          path: "dist/"

  deploy:
    needs: build
    runs-on: ubuntu-latest
    permissions:
      pages: write
      id-token: write
    environment:
      name: github-pages
      url: ${{ steps.deployment.outputs.page_url }}
    steps:
      - name: "Deploy 🚀"
        id: deployment
        uses: actions/deploy-pages@v4
Projects scaffolded using create-vue build in the dist/ directory by default. Ensure this matches the path provided to the upload-pages-artifact GitHub Action.
Wrap Up
Tips
Vue is a powerful yet lightweight framework for developing reactive web apps. Take advantage of the mature Vue ecosystem with the following tips.
Dynamic Imports
Lazy-load routes to facilitate code splitting. By replacing static route imports with dynamic imports, the bundler is able to split each route’s components into separate chunks. With dynamic imports, the browser only fetches route code when entering the page for the first time, then use the cached version on subsequent visits.
import { createRouter, createWebHistory } from "vue-router";
import HomeView from "../views/HomeView.vue";

const router = createRouter({
  history: createWebHistory(import.meta.env.BASE_URL),
  routes: [
    {
      path: "/",
      name: "home",
      component: HomeView
    },
    {
      path: "/about",
      name: "about",
      component: () => import("../views/AboutView.vue")
    }
  ]
});

export default router;
Component Library
Build faster with robust component libraries like PrimeVue, Vuetify, or Naive UI. Many libraries are keyboard-accessible by default, making D-pad navigation a breeze.
Standardized Formatting
create-vue provides several configurations like using Prettier for standardized, opinionated code formatting. Consistent code formatting can reduce cognitive strain so you can focus on building your app.
Testing
Develop reliably with testing utilities like Vitest and Playwright. Target Chromium in Playwright to most closely match Cloud Phone.
Next Steps
Register for the Cloud Phone Developer Program to try the live demo on the Cloud Phone Simulator or a physical device. Fork us on GitHub to start coding your first Cloud Phone widget using Vue and set up a custom domain name to point to GitHub Pages.